This post is also available in:
 Français
After several practice samples, I finally started my first garment this year. It is a pair of trousers from Artesane, part of the CAP Tailor course by Sandra Maciak-Hélias.
It’s been more than 10 years since I last sewed clothing, so I don’t feel entirely comfortable yet, but I have practiced all the details of the trousers through samples (pockets, fly). The next logical step is either to make the trousers in calico or to go ahead and make the actual trousers.
The Design
I started with these trousers because I really liked the design. They are supposed to be made in linen, but since I rarely wear trousers in summer and I actually need a wool pair, I opted for a 100% wool fabric. These trousers feature the following characteristics:
- Two welt pockets on the back
- Two slanted pockets on the front
- All seams are either bound or lined
- Luxury finishes, everything is neat both inside and out
- The trousers’ fly has a lined underlay
- Hand-stitching in several places
- A waistband extension, which I initially didn’t see the point of, but now I want to add it to all my trousers
- My little extra: Sandra mentioned the possibility of lining the trousers down to the knees and adding a cotton piece to protect the crotch. I only added the lining because wool trousers tend to itch, and I love the idea of adding a lining.
The Fabric
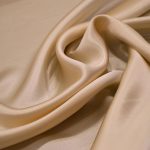
I bought a 100% wool flannel from the website tissus-de-reve.fr. I purchased 2.40 meters to make both the trousers and the waistcoat from the course (€39.90 per meter). The color matches quite well with my Suistudio coat.

This 100% wool flannel fabric from Italy has a deep, warm camel tone. Sourced through upcycling, it is not only of high quality but also eco-friendly. Flannel, with its tight weave, is renowned for its softness and warmth, making it ideal for winter garments. Supple and pleasant to the touch, this fabric is perfect for crafting suits and tailored pieces. Its pure wool composition ensures both comfort and durability while offering an impeccable drape.
Thanks to its soft and warm texture, this fabric is particularly well-suited for jackets, trousers, coats, and skirts. It can also be used for structured dresses or elegant ensembles. The dark camel hue adds a touch of sophistication and modernity to your creations while being easy to pair with other colors.
I don’t know which brand discarded this fabric, but its quality is excellent. It is luminous, has a very pleasant touch, and is warm. From a distance, one might think it’s cashmere. However, I didn’t know that the fabric needed to be pre-shrunk, so I did it with a damp cloth AFTER cutting the fabric. Fortunately, it didn’t shrink at all, and I had no surprises in that regard.
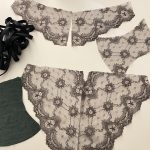
For the lining, I spent a morning debating whether to add one or not. Purchasing the lining is one thing, but deciding to take on this extra challenge for a first tailored garment is another. In the end, I decided to add the lining, and it turned out to be an excellent decision. The lining I chose is cupro, purchased from Lafayette Saltier Drapiers (ref 408/CARAMEL, €11.67 excl. VAT per meter). It is extremely thin, but the feel is divine.
For the other supplies, I also found them at Lafayette Saltier (I’ll share the references):
- A featherweight fusible interfacing, very pleasant, it feels like wool (ref. 7521N, €5 excl. VAT per meter)
- Horn buttons
- Silk buttonhole twist
- 100% cotton herringbone pocket lining, featherweight—I love it, the texture is divine (ref. 71550, €6.67 excl. VAT per meter)
- A waistband stiffener that I really enjoyed using for the first time—it adds structure to the waistband (ref. HAUSSE/BLC, €2.25 excl. VAT per meter)
I had the A0 pattern printed at the local print shop; it costs a bit more, but at least I can ask them to select only the layers with legends and my size. So the printed pattern perfectly matches my size—I don’t have to compare dashed lines, which is really nice.
Lessons Learned & Challenges Encountered
Being inexperienced, I didn’t immediately notice the tension issues with my machine. I thought the lower thread tension couldn’t be adjusted, but after watching a few videos, I learned that it could be done with a screwdriver. So after an afternoon spent cleaning and adjusting my machine, my thread tension is now more or less correct.
I didn’t know that the stitch length should be adjusted based on fabric thickness. At the slanted pockets, there’s a spot where the fabric goes from five layers to just two thin layers of pocket lining. After changing the stitch density (stitches/cm²), I noticed that the result was much better.
I bought a sewing thread that I thought was darker than my fabric. At the store, they showed me a different technique to check if the thread matched: instead of placing the entire spool next to the fabric, I should pull out a single thread and compare it directly. Turns out, I already had the right color without realizing it.
I followed the fabric yardage recommendations from the pattern without realizing that, since I was making a size 34, I could save a lot of fabric. Instead of staggering the two pant legs like in larger sizes, I could place them side by side, meaning I only needed about 1.3 times the length of the pants. I had so much fabric left over that I could make an additional vest. That was a nice surprise! So I made a note to always print the pattern first, cut out the pieces, arrange them on a table, and measure the exact yardage needed before purchasing fabric.
Even though I chose a size 34, this pattern was designed for wider hips and a lower crotch. As a result, the pants didn’t quite fit me as expected, despite the measurements provided in the pattern. Now I understand why making a toile is so important before cutting into the real fabric. However, I don’t plan on modifying patterns for my next tailoring projects (the two jackets, since those adjustments are quite complex). But if I make these pants again, I’ll go with custom measurements and simply keep the fly construction, which I really like.
Strangely, I didn’t struggle much with reading the assembly instructions. There was just one mistake in the instructions, but it was easy to fix after watching Sandra’s video. Interestingly, there were also errors in Sandra’s video that had already been corrected in the written instructions. So overall, it’s important to watch the entire video and read all the instructions before starting the project.
Despite my obsession with ironing, my iron wasn’t powerful enough, and my pressing cloth wasn’t transparent enough. Many times, I was pressing without actually seeing what I was ironing. By the end, I got better at handling my basic household iron. Instead of setting up the bulky ironing board that blocked my workspace, I found it easier to use my tailor’s ham with a thick layer of cotton canvas. I’ll take my pants to the dry cleaner to get nice, crisp front pleats.
I injured myself multiple times by touching needles and pins. Now, I always protect my fingers when handling them. It takes me just two seconds to put on my finger guards.
It took me a while to organize my workspace and arrange my tools in a logical way. Now that I have a system, I know exactly where everything is, which speeds up my process.
Following the tutorial, I finished the pant seams with cotton bias binding. It made the pants more rigid, and I think I would have been more comfortable with silk bias tape… or just serging the edges. But now I know for next time.
When in doubt, basting is always a good idea. I find that basting takes less time than unpicking stitches. I love using pins as well, but for the waistband, basting was definitely the right choice.
Photos
Here are some photos of my project. It’s not perfect yet, but I hope to improve in the future. I think this project took me four full days. I changed the shape of the belt loops and hand-stitched the hem. Being petite, I don’t like cuffs.


This post is also available in:
Français