This post is also available in:
 Français
I resumed sewing seriously in February 2025 and I’m documenting my progress month by month. Here is my progress in April 2025.
A cotton poplin shirt for JB
JB really liked his custom-made shirts from Vietnam but he’s not as fond of the fabric (not breathable enough) so I decided to sew him a band collar shirt following the tutorial The classic shirt by Tanya Sayer on Artesane. What I liked about this tutorial are the high-end finishes (French seams throughout) and the professional tips from Tanya Sayer who worked in haute couture. What I like a bit less is the A4 pattern. I’m used to A0 patterns and having to tape each sheet together drives me crazy!
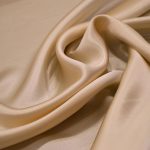
I opted for a NAVY BLUE COTTON POPLIN that’s upcycled (from a French haute couture house, which one? I don’t know) from My Little Coupon. I paid €23.4 for 3 meters during the winter sales.

The navy blue cotton poplin of 106.66 g/m2 offers ideal lightness and versatility for various sewing projects. With its lightweight of 106.66 g/m2, this fabric is perfect for making shirts, blouses, and other summer clothing. The navy blue shade gives a classic elegance to your creations, while offering a neutral canvas that easily pairs with other colors. Choose this cotton poplin for comfortable and stylish pieces, perfect for sunny days.
Color: Navy blue
Width: 150cm
Composition: 100% Cotton
Weight: 160g/ml – 106.66g/m2
Seeing 106g/m², I was a bit afraid: afraid of not being able to handle such a fine fabric. But actually, the fabric isn’t that thin, it has a certain rigidity, and it’s quite easy to sew. The main difficulty is rather washing these 3 meters of fabric and ironing them (!!!). I don’t know how many threads per cm it has, but this fabric is of superior quality, it doesn’t fray easily, and the color doesn’t fade when washed. The color is magnificent and eye-catching.
Since sewing takes time, I try to achieve the same finishes and details as luxury brands. I say “I try,” I’m not saying I’ve succeeded 😀
Luxury shirts are made with very tight stitches; I set my machine to 2.0, which gives approximately 8 stitches/cm.
For the collar, I opted for a very thin interfacing found at Lafayette Saltiel Drapiers.
And for the buttons, I chose navy-tinted mother-of-pearl buttons also from Lafayette Saltiel Drapiers. Mother-of-pearl buttons bring luminosity to the shirt and the feel is very luxurious. They don’t cost that much, so I highly recommend them as they are buttons used by luxury brands for their shirts.
This is the first time I’ve made buttonholes with my small sewing machine and the result isn’t too bad. In the excitement, I forgot to sew the last buttonhole (near the hips) horizontally like luxury brands do (this allows for some ease). At least for the collar, I placed it properly parallel to the seam line.
I first sewed the buttons by hand in a lily pattern on a shank, but it’s not very regular. Then, I learned to sew them with the zigzag stitch on the machine (widths 3.5 and 4.5) and I use the remaining thread to make a large knot at the base of the button. I think it looks pretty good. This “lily” pattern is also highly appreciated by luxury brands because for a long time, they had to be done by hand.


Apart from the collar, there are no major difficulties because I’m cheating: I opt for short sleeves (there’s a better chance JB will wear it this summer than if it had long sleeves), eliminating the need for cuffs and plackets, which saves me a day of sewing.
It’s when adding all the buttons that I realize my shirt plackets don’t overlap properly. And at the collar level, the height of the collar isn’t the same on both sides. And I created wrinkles when sewing the collar. I can correct only one problem by repositioning the buttons in the right places, but the collar remains a bit asymmetrical this time; I need to motivate myself to redo the collar.
The problems don’t end there. Following the measurements indicated on the tutorial pattern, I opted for a size that was a bit too large. While the shoulders fit JB, neither the sleeves nor the width suited him. After the initial disappointment, I was able to readjust the shirt and it fits him better now.
I still have plenty of things to do:
- redo the collar
- add the gussets
- move the bottom button a few millimeters
- learn to copy one of JB’s favorite shirts
- learn pattern making

Cost
- Fabric €23.4 for 3 meters (I used 2 meters for JB)
- Interfacing: about €2
- Buttons: €9
- Thread: €4
- TOTAL: €38.4
- 2 days of work
- Tutorial & pattern: €44 from Artesane
This post is also available in:
Français